
തുണികൾ അലക്കിയിട്ട് വൃത്തിയാവുന്നില്ല എന്ന പരാതി ഇനി വേണ്ട; മാസത്തിലൊരിക്കൽ വാഷിംഗ് മെഷീൻ ഇങ്ങനെ ചെയ്യു; ഇല്ലെങ്കിൽ പണി കിട്ടും; ഇതറിയാതെ പോവല്ലേ..!! | Washing Machine Deep Cleaning
Washing Machine Deep Cleaning : മുൻകാലങ്ങളിൽ നിന്നും വ്യത്യസ്തമായി ഇന്ന് തുണികൾ അലക്കാനായി മിക്ക വീടുകളിലും വാഷിംഗ് മെഷീനുകളാണ് ഉപയോഗിക്കുന്നത്. എന്നാൽ ഇത്തരത്തിൽ ഉപയോഗിക്കുന്ന വാഷിംഗ് മെഷീനുകൾ ഒരിക്കൽ വാങ്ങി കഴിഞ്ഞാൽ പിന്നീട് ക്ളീൻ ചെയ്യേണ്ടതില്ല എന്നാണ് പലരും കരുതുന്നത്. ഇത്തരത്തിൽ വാഷിംഗ് മെഷീനുകൾ കഴുകാതെ ഉപയോഗപ്പെടുത്തിയാൽ അത് പല രീതിയിലുള്ള അസുഖങ്ങളും
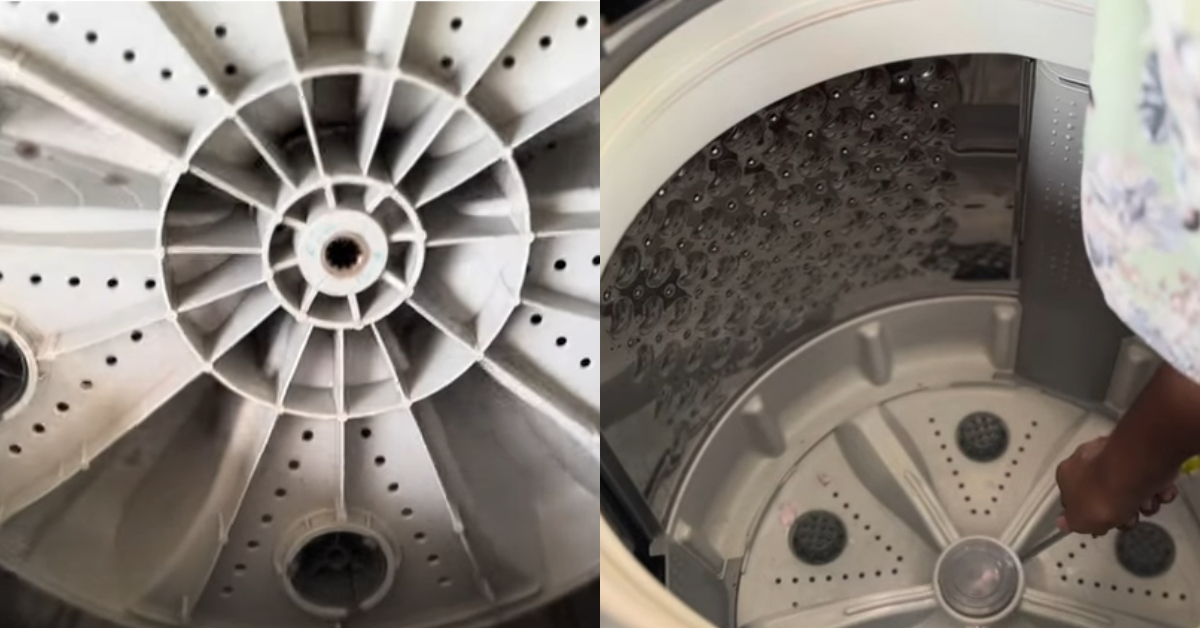
വരുത്തുന്നതിന് കാരണമാകും. അതുകൊണ്ടുതന്നെ മാസത്തിൽ ഒരു തവണയെങ്കിലും വാഷിംഗ് മെഷീൻ ക്ളീൻ ചെയ്യേണ്ടതുണ്ട്. അത് എങ്ങിനെയാണെന്ന് വിശദമാക്കാം. ഇപ്പോൾ വിപണിയിൽ വാഷിംഗ് മെഷീൻ ക്ലീൻ ചെയ്യുന്നതിന് ആവശ്യമായ പ്രത്യേക ലിക്വിഡുകളെല്ലാം ലഭ്യമാണ്. ഒന്നുകിൽ അത് ഉപയോഗിച്ചോ അല്ലെങ്കിൽ വാഷിങ്ങിനായി ഉപയോഗിക്കുന്ന അതേ സോപ്പ് പൊടി ഉപയോഗപ്പെടുത്തിയോ വാഷിംഗ് മെഷീനിന്റെ ഉൾഭാഗങ്ങളെല്ലാം എളുപ്പത്തിൽ ക്ലീൻ ചെയ്ത് എടുക്കാവുന്നതാണ്. പ്രധാനമായും സോപ്പ് ഇടുന്ന
ട്രേ, ടബ്ബിന്റെ സൈഡ് വശങ്ങൾ, ഡോറിന്റെ സൈഡ് വശങ്ങൾ എന്നീ ഭാഗങ്ങളെല്ലാം തീർച്ചയായും വൃത്തിയാക്കണം. ചെറിയ ഇടുക്കുകലെല്ലാം വൃത്തിയാക്കാനായി ഒരു പപ്പടക്കോലിൽ തുണി ചുറ്റിയോ അതല്ലെങ്കിൽ ഉപയോഗിക്കാത്ത ബ്രഷോ ഉപയോഗപ്പെടുത്താവുന്നതാണ്. അതുപോലെ ഒരു തുണി ഉപയോഗിച്ച് ടബ്ബിന്റെ ഉൾവശമെല്ലാം നല്ല രീതിയിൽ തുടച്ചെടുക്കുക.ടബ്ബിന്റെ അകത്തുള്ള ചെറിയ ഫിൽട്ടറുകൾക്ളീൻ ചെയ്ത് എടുക്കാനായി ഒരു സ്ക്രൂഡ്രൈവർ ഉപയോഗിച്ച് അത് അഴിച്ചെടുത്തശേഷം ക്ലീൻ ചെയ്ത് തിരികെ ഫിറ്റ്
ചെയ്യാവുന്നതാണ്. ഇത്തരത്തിൽ ഉൾവശമെല്ലാം പൂർണമായും വൃത്തിയാക്കി പിന്നീട് ഒരു ഫുൾ സൈക്കിൾ ഇട്ട് ക്ലീൻ ചെയ്ത് എടുക്കാനായി അല്പം സോപ്പുപൊടിയോ, അല്ലെങ്കിൽ ലിക്വിഡോ ട്രെയിൽ ഒഴിച്ച ശേഷം വാഷിംഗ് മെഷീൻ ഓൺ ചെയ്തു വൃത്തിയാക്കി എടുക്കണം. ഓട്ടോ മോഡിൽ ക്ലീൻ ചെയ്യുന്ന വാഷിംഗ് മെഷീനുകൾ ആണെങ്കിൽ ആ ഒരു രീതിയാണ് ക്ലീനിങ്ങിനായി തിരഞ്ഞെടുക്കേണ്ടത്. ഇതേപ്പറ്റി കൂടുതൽ വിശദമായി മനസ്സിലാക്കാൻ വീഡിയോ കാണാവുന്നതാണ്. Washing Machine Deep Cleaning CREDIT : Hobby Spot by Husna Farhath
🧼 Washing Machine Deep Cleaning Guide
🕒 How Often?
- Deep clean every 1–2 months
- Clean lint filters and wipe the drum weekly
⚙️ Materials Needed:
- White vinegar – 2 cups
- Baking soda – 1/4 to 1/2 cup
- OR
- Washing machine cleaner tablets (e.g., IFB Descal, Dettol, or Bosch machine cleaner)
- Microfiber cloth or sponge
- Old toothbrush
- Warm water
🌀 For Front-Load Washing Machines
1. Clean the Door Seal (Rubber Gasket)
- Wipe the rubber gasket with a cloth soaked in vinegar.
- Use an old toothbrush to scrub mold or residue.
2. Drum Cleaning Cycle
- Add 2 cups white vinegar directly into the drum.
- Add 1/4 cup baking soda to the detergent tray.
- Run a hot water cycle or the machine’s tub clean cycle.
3. Clean Detergent Drawer
- Remove and soak it in warm, soapy water.
- Scrub with a brush, rinse, and dry before reinserting.
4. Wipe Exterior
- Clean buttons, screen, and body with a damp cloth.
🔄 For Top-Load Washing Machines
1. Fill with Hot Water
- Set to the longest and hottest cycle.
- Let the drum fill with water.
2. Add Cleaners
- Add 2 cups vinegar and 1/2 cup baking soda.
- Let it agitate for 5–10 mins, then pause for 1 hour to soak.
3. Resume and Finish the Cycle
- After soaking, complete the wash cycle.
4. Scrub Inside
- While water is draining or after it’s empty, scrub the drum and agitator with a brush if needed.
🧺 Final Steps (Both Types)
✅ Clean the Filter (Important!)
- Check and clean the lint filter or drain pump filter (usually at the bottom for front-load).
- Remove lint, coins, hair, etc.
✅ Leave Door Open
- After cleaning, leave the door open for a few hours to prevent mildew and smells.
🛡️ Optional (but Helpful)
- Use descaling powder monthly if you have hard water.
- Use liquid detergent over powder to reduce residue buildup.
Comments are closed.