
ഉരുളകിഴങ്ങ് വളരെ എളുപ്പത്തിൽ വീട്ടിൽ കൃഷി ചെയ്താലോ; പിവിസി പൈപ്പ് കൊണ്ട് ഇങ്ങനെ ചെയ്താൽ മതി; ധാരാളം കിഴങ്ങ് ഉണ്ടാകും; അറിയാത്തവർക്ക് പറഞ്ഞു കൊടുക്കൂ…!! | Potato Krishi Using PVC Pipes
Potato Krishi Using PVC Pipes : പടവലങ്ങ, പാവലം, വെണ്ട പോലുള്ള പച്ചക്കറികലെല്ലാം വീട്ടിൽ കൃഷി ചെയ്തെടുക്കുന്ന പതിവ് നമ്മുടെ നാട്ടിലെ മിക്കയിടങ്ങളിലും ഉള്ളതാണ്. എന്നാൽ പലരും കരുതുന്ന ഒരു കാര്യമാണ് ഉരുളക്കിഴങ്ങ് പോലുള്ള കിഴങ്ങ് വർഗ്ഗങ്ങൾ നമ്മുടെ നാട്ടിൽ വളർത്തിയെടുക്കാൻ സാധിക്കില്ല എന്നത്. ചെറിയ രീതിയിൽ പരിചരണം നൽകുകയാണെങ്കിൽ ഉരുളക്കിഴങ്ങും വീട്ടിൽ തന്നെ കൃഷി ചെയ്ത് എടുക്കാവുന്നതാണ്.
അത് എങ്ങിനെയാണെന്ന് വിശദമായി മനസ്സിലാക്കാം. ഉരുളക്കിഴങ്ങ് കൃഷി ചെയ്യാൻ തുടങ്ങുന്നതിനു മുൻപായി അത് മുളപ്പിച്ചെടുക്കണം. അതിനായി അത്യാവിശ്യം മൂത്ത രണ്ടോ മൂന്നോ ഉരുളക്കിഴങ്ങ് എടുത്ത് അത് ഒരു നനവുള്ള തുണിയിൽ പൊതിഞ്ഞ് സൂക്ഷിക്കാവുന്നതാണ്. ഇങ്ങനെ ചെയ്യുന്നത് വഴി കിഴങ്ങ് പെട്ടെന്ന് തന്നെ മുളച്ചു കിട്ടും. അതിനുശേഷം പോട്ടിങ് മിക്സ് തയ്യാറാക്കാൻ ആവശ്യമായ കാര്യങ്ങൾ
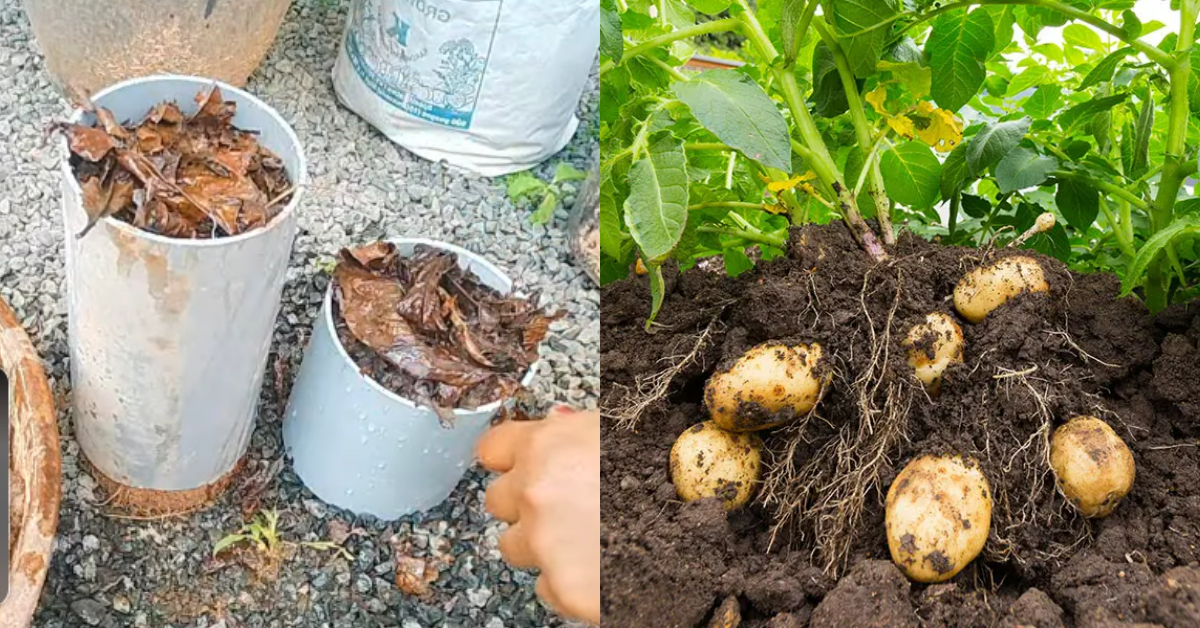
ചെയ്യാവുന്നതാണ്. അതിനായി ഒരു വട്ടമുള്ള പിവിസി പൈപ്പാണ് പ്രധാനമായും ഉപയോഗിക്കുന്നത്. മീഡിയം വലിപ്പത്തിലുള്ള ഒരു പിവിസി പൈപ്പ് എടുത്ത് അതിന്റെ താഴെ വശത്തായി ഒരു ചിരട്ട ഫിക്സ് ചെയ്തു കൊടുക്കുക. അതിലേക്ക് കരിയില,ചാരപ്പൊടി, അടുക്കളയിൽ നിന്നും ലഭിക്കുന്ന പച്ചക്കറികളുടെ വേസ്റ്റ് എന്നിവ മിക്സ് ചെയ്തെടുത്ത പോട്ടിംങ്ങ് മിക്സ് ഉപയോഗപ്പെടുത്താവുന്നതാണ്. പൈപ്പിന്റെ ഏറ്റവും താഴത്തെ ലൈയറിലായി കരിയില നിറച്ചു കൊടുക്കാം. അതിന് മുകളിലായി തയ്യാറാക്കി
വെച്ച പോട്ടിംഗ് മിക്സ് നിറച്ചു കൊടുക്കുക. അല്പം വെള്ളം മണ്ണിനു മുകളിലായി ഒഴിച്ച ശേഷം മുളപ്പിച്ചു വെച്ച ഉരുളക്കിഴങ്ങ്,ചെറിയ കഷണങ്ങളായി മുറിച്ചെടുത്ത് മണ്ണിലേക്ക് ഇറക്കി വയ്ക്കുക. വളരെ കുറഞ്ഞ ദിവസങ്ങൾക്കുള്ളിൽ തന്നെ കിഴങ്ങിൽ നിന്നും മണ്ണിലേക്ക് ഇറങ്ങി പിടിക്കുന്നതാണ്. പിന്നീട് ചെറിയ രീതിയിൽ പരിചരണം നൽകിയാൽ തന്നെ ആവശ്യത്തിന് ഉള്ള വിളവ് ലഭിക്കും. കൂടുതൽ വിശദമായി മനസ്സിലാക്കാൻ വീഡിയോ കാണാവുന്നതാണ്. Potato Krishi Using PVC Pipes Credit : POPPY HAPPY VLOGS
✅ Potato Krishi Using PVC Pipes – Step-by-Step Guide
🔧 Materials Needed:
- PVC pipe (6 to 8 inches diameter, 3 to 4 feet length)
- Drill or cutter (to make holes)
- Seed potatoes (preferably sprouted)
- Good quality soil + compost + cocopeat mix
- Gravel or small stones (for drainage)
- Watering can or drip setup
🌱 Steps to Grow Potatoes in PVC Pipes:
- Cut and Prepare the Pipe:
- Use a PVC pipe of 3–4 feet height.
- Drill holes on the sides (1-2 inches wide) for air circulation and side growth.
- Set Up the Base:
- Place gravel or small stones at the bottom (6 inches) for drainage.
- Layer the Soil:
- Fill pipe in layers: soil + compost + cocopeat. Mix well.
- Plant the Potatoes:
- Place 2–3 seed potatoes at the bottom layer, then cover with 6 inches of soil.
- Add Soil as It Grows:
- As the plant grows taller, keep adding more soil (this encourages tuber growth vertically).
- Watering:
- Keep the soil moist, not waterlogged. Use a drip system or water gently.
- Sunlight:
- Ensure 6–8 hours of sunlight daily.
- Harvest:
- After 80–100 days, cut open the pipe or remove soil from the top to harvest fresh, healthy potatoes.
🌟 Benefits of Using PVC Pipes for Potato Cultivation:
- Space-saving – perfect for balconies, rooftops
- Prevents soil-borne diseases
- Easy to manage and harvest
- Promotes vertical gardening
- Reusable year after year
Comments are closed.