
ചകിരി ഉണ്ടോ വീട്ടിൽ; കോവക്ക കുലപോലെ കായ്ക്കാൻ ഇതുമാത്രം മതി; ഇനി കിലോ കണക്കിന് കോവക്ക വീട്ടിലെ ചെടിയിൽ ഉണ്ടാകും; ഈ സൂത്രം അറിഞ്ഞാൽ…!! | Kovakka Krishi Tips Using Coconut Husk
Kovakka Krishi Tips Using Coconut Husk : കോവൽ കൃഷി തുടങ്ങാൻ ഇതിലും എളുപ്പമാർഗ്ഗം വേറെയില്ല! വളരെ കുറഞ്ഞ രീതിയിലുള്ള പരിചരണം കൊണ്ട് തന്നെ എളുപ്പത്തിൽ വളർത്തിയെടുക്കാവുന്ന ഒരു ചെടിയാണ് കോവൽ. ഒരിക്കൽ പടർത്തി വിട്ട് കഴിഞ്ഞാൽ വളരെ പെട്ടെന്നു തന്നെ അത് പടർന്നു പന്തലിക്കുകയും നല്ല രീതിയിൽ കായ് ഫലങ്ങൾ നൽകുകയും ചെയ്യാറുണ്ട്. എന്നിരുന്നാലും പലർക്കും കോവൽ കൃഷി ചെയ്യേണ്ട രീതിയെ പറ്റി അത്ര
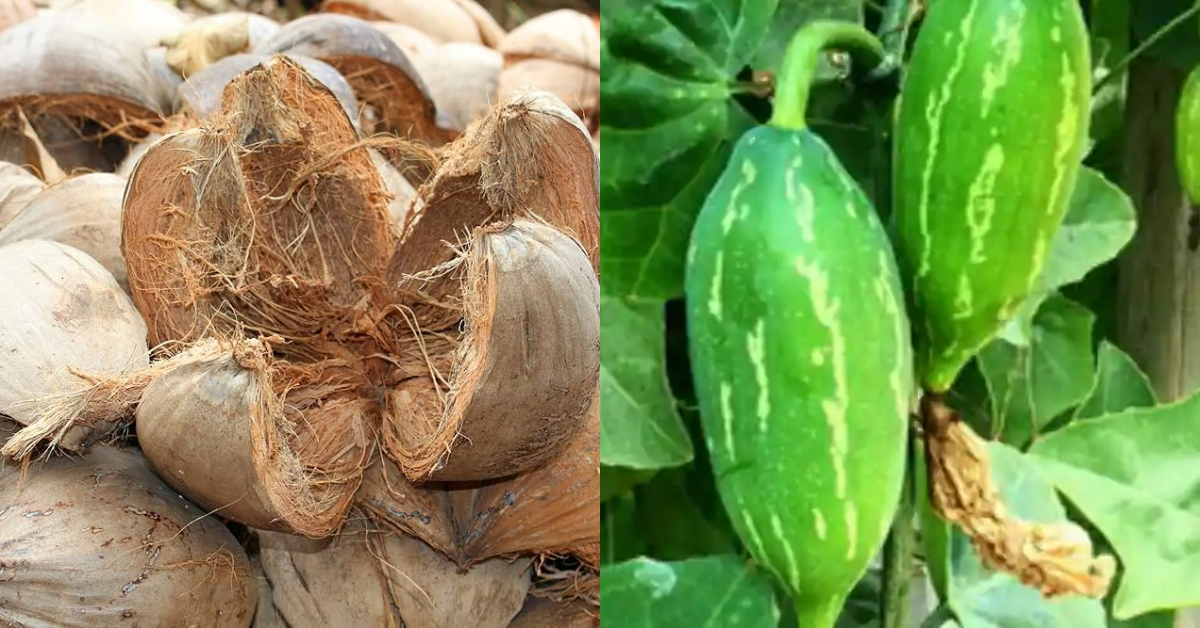
അറിവുണ്ടായിരിക്കില്ല. അത്തരം ആളുകൾക്ക് തീർച്ചയായും ചെയ്തു നോക്കാവുന്ന ഒരു കോവൽ കൃഷി രീതിയാണ് ഇവിടെ വിശദമാക്കുന്നത്. കൃഷി തുടങ്ങുന്നതിന് മുൻപായി തന്നെ നല്ല മൂത്ത തണ്ട് നോക്കി വെട്ടിയെടുത്ത് അത് വളർത്തിയെടുത്താണ് ചെടി പടർത്തിവിടേണ്ടത്. ഈയൊരു രീതിയിൽ ചെടി നട്ടുപിടിപ്പിക്കാനായി തേങ്ങയുടെ ചകിരിയോടു കൂടിയ തൊണ്ടിന്റെ ഭാഗം ഉപയോഗപ്പെടുത്താവുന്നതാണ്.
Ingredients for Soil Mix:
- Coconut husk chips / pieces – 40%
- Red soil or garden soil – 30%
- Compost / cow dung manure / vermicompost – 30%
Kovakka Cultivation Using Coconut Husk
ആദ്യം തന്നെ തൊണ്ട് പൂർണ്ണമായും തുറന്ന് വച്ച ശേഷം അതിനകത്തേക്ക് അല്പം മണ്ണിട്ട് കൊടുക്കുക. ജൈവവള കമ്പോസ്റ്റ് മിക്സ് ചെയ്ത മണ്ണാണ് ഉപയോഗിക്കുന്നത് എങ്കിൽ ചെടി പെട്ടെന്ന് തന്നെ വളർന്നു കിട്ടുന്നതാണ്. മണ്ണിട്ടശേഷം മൂത്ത കമ്പ് നോക്കി മുറിച്ചെടുത്ത് അത് നടുക്കായി വെച്ചശേഷം തൊണ്ടിന് ചുറ്റും ഒരു നാരുപയോഗിച്ച് കെട്ടിയശേഷം മാറ്റിവെക്കുക. ഇങ്ങനെ ചെയ്യുമ്പോൾ വളരെ പെട്ടെന്ന് തന്നെ ചെടിയിൽ
നിന്നും വേര് ഇറങ്ങി കിട്ടുന്നതാണ്. ചെടിയുടെ വേര് നല്ല രീതിയിൽ പിടിച്ച് കിട്ടിക്കഴിഞ്ഞാൽ പിന്നീട് അത് റീപോട്ട് ചെയ്യാം. ഒന്നുകിൽ ഉപയോഗിക്കാത്ത പ്ലാസ്റ്റിക് ബക്കറ്റോ, കവറോ ഉണ്ടെങ്കിൽ അതിൽ കരിയിലയും മണ്ണും നിറച്ച് തൊണ്ടോടുകൂടി തന്നെ ചെടി ഇറക്കി വയ്ക്കാവുന്നതാണ്. കൂടാതെ പ്ലാസ്റ്റിക് ചാക്കുകൾ വീട്ടിലുണ്ടെങ്കിൽ അതിലും കരിയിലയും മണ്ണും നിറച്ച ശേഷം തൊണ്ടോടു കൂടിയ ചെടി ഇറക്കി വയ്ക്കാവുന്നതാണ്. ഈയൊരു രീതിയിൽ കോവൽ കൃഷി ചെയ്തെടുക്കുകയാണെങ്കിൽ നല്ല രീതിയിൽ കായ്ഫലങ്ങൾ ലഭിച്ചു തുടങ്ങുന്നതാണ്. കൂടുതൽ വിശദമായി മനസ്സിലാക്കാൻ വീഡിയോ കാണാവുന്നതാണ്. Kovakka Krishi Tips Using Coconut Husk credit : POPPY HAPPY VLOGS
Kovakka Krishi (Ivy Gourd Cultivation) Using Coconut Husk is a smart, organic way to grow ivy gourd (Coccinia grandis), especially in South Indian home gardens. Coconut husk is a natural, sustainable material that can greatly benefit ivy gourd cultivation when used correctly.
Here’s how to use coconut husk (thenga tholi) effectively in Kovakka Krishi:
Benefits of Coconut Husk in Kovakka Cultivation
- Retains moisture in the soil for longer.
- Discourages pests and root rot when properly dried.
- Improves aeration in the root zone.
- Eco-friendly and sustainable, especially for terrace or grow bag gardening.
1. As a Potting Medium (for Grow Bags or Pots)
Tips:
- Soak dry coconut husk in water for 1–2 days before use.
- Use small pieces (2–3 inches) mixed into the bottom of grow bags or pots to retain moisture.
- Acts like a natural sponge, reducing watering frequency.
2. As Mulch Around the Plant (In Soil or Grow Bags)
- Place dried coconut husk pieces or coir around the base of the plant.
- Helps prevent weeds and retains soil moisture.
- Keeps the roots cool and encourages better fruiting.
3. Support for Vine Growth
- Kovakka is a climbing vine—needs strong support.
- Coconut husk fiber or rope (coir rope) can be used to tie vines gently to trellises or poles.
- Natural and safe for the plant stem.
4. Watering Tip with Husk
- Coconut husk absorbs water and releases it slowly.
- In summer, you can keep a few large soaked husks at the base to reduce water stress on the plant.
Bonus: Natural Organic Fertilizer Tips
- Mix buttermilk + rice water and apply once every 15 days.
- Use wood ash + cow dung around the root zone monthly for better flowering and fruiting.
Comments are closed.