
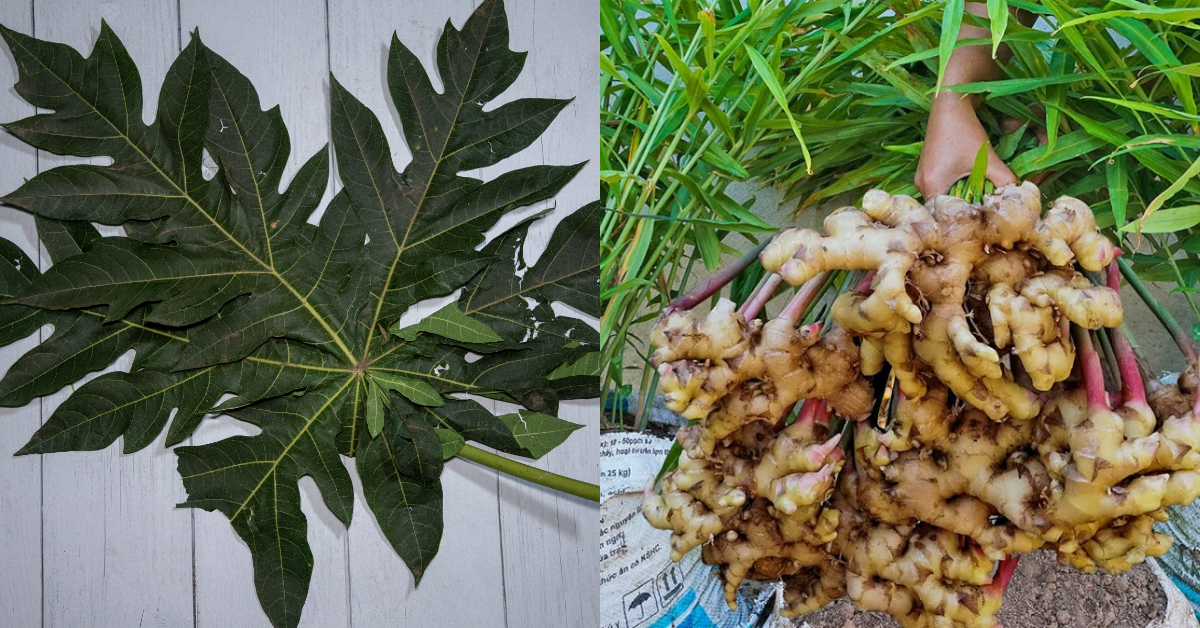
വീട്ടിലെ ആവശ്യങ്ങൾക്കുള്ള ഇഞ്ചി വീട്ടിൽ തന്നെ കൃഷി ചെയ്ത എടുക്കാം; ഈയൊരു ഇല കൊണ്ടുള്ള സൂത്രം പരീക്ഷിക്കൂ; ഒരു ചാക്ക് നിറയെ ഇഞ്ചി ഉണ്ടാകും..!! | Ginger Cultivation Method
Ginger Cultivation Method : അടുക്കളയിൽ മിക്ക കറികളും തയ്യാറാക്കുന്നതിൽ ഒഴിച്ചുകൂടാനാവാത്ത ഒന്നാണല്ലോ ഇഞ്ചി. ധാരാളം ഔഷധഗുണങ്ങളുള്ള ഇഞ്ചി കറികളിൽ ചേർത്ത് കഴിക്കുമ്പോൾ അത് ആരോഗ്യത്തിന് വളരെയധികം ഗുണം ചെയ്യുമെന്ന കാര്യത്തിൽ തർക്കമില്ലല്ലോ. എന്നാൽ ഇപ്പോൾ മുൻകാലങ്ങളിൽ നിന്നും വ്യത്യസ്തമായി കൂടുതൽ ആളുകളും കടകളിൽ നിന്നും ഇഞ്ചി വാങ്ങി ഉപയോഗിക്കുന്ന പതിവായിരിക്കും ഉള്ളത്. ഇത്തരത്തിൽ ലഭിക്കുന്ന ഇഞ്ചിയിൽ എത്രമാത്രം വിഷാംശം അടിച്ചിട്ടുണ്ട് എന്ന കാര്യം നമുക്ക് പറയാനായി സാധിക്കുകയില്ല.
അത്തരം സാഹചര്യങ്ങളിൽ വളരെ ചെറിയ രീതിയിൽ പരിപാലനം നൽകി കൊണ്ടു തന്നെ വീട്ടാവശ്യങ്ങൾക്കുള്ള ഇഞ്ചി എങ്ങനെ കൃഷി ചെയ്തെടുക്കാൻ സാധിക്കുമെന്ന് വിശദമായി മനസ്സിലാക്കാം. ഇഞ്ചി കൃഷി ചെയ്യുന്നതിനും നല്ല രീതിയിൽ വളർച്ച ലഭിക്കുന്നതിനുമായി ഉപയോഗിക്കാവുന്ന ഒന്നാണ് പപ്പായയുടെ ഇല. ഇഞ്ചി നടാനായി ഉപയോഗിക്കുന്ന പോട്ടിങ് മിക്സിൽ പപ്പായയുടെ ഇല കൂടി ചേർത്ത് കൊടുക്കുകയാണെങ്കിൽ ചെടിയിൽ ഉണ്ടാകുന്ന കീടങ്ങൾ നശിക്കുകയും ചെടി ആരോഗ്യപരമായ രീതിയിൽ വളരുകയും ചെയ്യുന്നതാണ്.
പോട്ട് അല്ലെങ്കിൽ ഗ്രോ ബാഗ് ഉപയോഗിച്ചാണ് ഇഞ്ചി കൃഷി ചെയ്യുന്നത് എങ്കിൽ അതിൽ ഏറ്റവും താഴത്തെ ലെയറിൽ ഉണങ്ങിയ പപ്പായയുടെ ഇല ശീമക്കൊന്നയുടെ ഇല എന്നിവയെല്ലാം നിറച്ചു കൊടുക്കാവുന്നതാണ്. അതിന്റെ മുകൾഭാഗത്തായി ജൈവരീതിയിൽ തയ്യാറാക്കിയ പോട്ടിങ് മിക്സ് നിറച്ചു കൊടുക്കാം. ശേഷം മുളപ്പിച്ച ഇഞ്ചി മണ്ണിലേക്ക് ഇറക്കിവച്ച് വീണ്ടും മുകളിൽ ഒരു ലയർ കൂടി പപ്പായയുടെ ഇല പൊതയായി ഇട്ടു കൊടുക്കാവുന്നതാണ്. ഇങ്ങനെ ചെയ്യുമ്പോൾ ചെടിക്ക് നല്ല രീതിയിൽ തണുപ്പ് ലഭിക്കുകയും പെട്ടെന്നുതന്നെ അവ മുളച്ചു തുടങ്ങുകയും ചെയ്യുന്നതാണ്. മുളപ്പിച്ച് എടുക്കുന്ന ഇഞ്ചി വേണമെങ്കിൽ മണ്ണിലേക്ക് നേരിട്ട് നട്ടുപിടിപ്പിക്കുകയും ചെയ്യാവുന്നതാണ്.
ഇഞ്ചി നട്ടു കഴിഞ്ഞാൽ ഏകദേശം 10 മാസത്തിനുശേഷം വിളവ് എടുക്കാവുന്നതാണ്. മണ്ണിലാണ് ഇഞ്ചി നടുന്നത് എങ്കിൽ ഇടയ്ക്കിടയ്ക്ക് മണ്ണ് ഇളക്കി കൊടുക്കുകയും ചുറ്റുമുള്ള പുല്ലും മറ്റും വെട്ടി വൃത്തിയാക്കുകയും ചെയ്യേണ്ടത് അത്യാവശ്യമാണ്. ഇത്തരം കാര്യങ്ങളെല്ലാം ശ്രദ്ധിക്കുകയാണെങ്കിൽ വീട്ടാവശ്യങ്ങൾക്കുള്ള ഇഞ്ചി വളരെ എളുപ്പത്തിൽ തന്നെ കൃഷി ചെയ്തെടുക്കാനായി സാധിക്കും. കൂടുതൽ വിശദമായി മനസ്സിലാക്കാൻ വീഡിയോ കാണാവുന്നതാണ്. Ginger Cultivation Method Credit : POPPY HAPPY VLOGS
🌱 Ginger Cultivation Method (Zingiber officinale)
1. Climate & Soil Requirements
- Climate: Warm and humid climate (20°C – 30°C); rainfall of 1500–3000 mm.
- Soil: Well-drained, loamy or sandy loam soil rich in organic matter; pH: 5.5–6.5.
- Avoid waterlogging.
2. Land Preparation
- Plough the land 2–3 times to remove weeds and loosen the soil.
- Prepare raised beds (15–25 cm high, 1 m wide, with 40–50 cm spacing).
- Add well-decomposed FYM (Farm Yard Manure) or compost (20–25 tons/ha).
3. Seed Material (Rhizomes)
- Use disease-free rhizomes from healthy plants (preferably 3–5 cm long with buds).
- Seed rate: 1500–2000 kg/ha.
- Pre-treat rhizomes with fungicide (e.g., Mancozeb) or natural alternatives like Trichoderma.
4. Planting
- Best time: April–May (pre-monsoon).
- Plant rhizomes at 5–10 cm depth, spaced 20 cm apart within rows, and rows 30 cm apart.
- Cover with soil and mulch with green leaves or straw.
5. Irrigation
- Requires light but frequent watering.
- In rainfed conditions, ensure good mulching; in dry areas, irrigate every 7–10 days.
6. Mulching
- Essential to conserve moisture, suppress weeds, and improve rhizome development.
- Apply green leaves at planting and again at 45 and 90 days.
7. Fertilizer Application
- Apply organic manure + NPK fertilizers (75:50:50 kg/ha).
- Split doses of nitrogen at 45 and 90 days after planting.
- Use biofertilizers (Azospirillum, Pseudomonas) for sustainable growth.
8. Weeding & Earthing Up
- Weed at 30, 60, and 90 days after planting.
- Earthing up (pulling soil around base) after each weeding helps rhizome expansion.
9. Pests & Diseases
- Common pests: Shoot borer, rhizome fly.
- Diseases: Rhizome rot, bacterial wilt, leaf spot.
- Use organic sprays (Neem oil, Trichoderma) or recommended fungicides.
10. Harvesting
- Harvesting time: 7–8 months after planting.
- For fresh ginger: harvest at 5–6 months.
- Mature ginger: 8–10 months.
- Uproot rhizomes carefully, clean and sun-dry for a few days.
Comments are closed.