
പൊട്ടിയ ഓട് ഉണ്ടോ വീട്ടിൽ; ചീര പറിച്ചു മിടുക്കൻ ഇതുമതി; വെറും 15 ദിവസം മതി ചീര തഴച്ചു വളരാൻ; ഈ സൂത്രം പണികൾ ഇതൊന്ന് ചെയ്തു നോക്കൂ…!! | Cheera Krishi Easy Tips Using Oodu
Cheera Krishi Easy Tips Using Oodu : വീട്ടിലെ ആവശ്യങ്ങൾക്കുള്ള ചീര മുറ്റത്ത് തന്നെ വളർത്തിയെടുക്കാൻ സാധിക്കുകയാണെങ്കിൽ അത് നല്ല കാര്യമല്ലേ. കാരണം ഇന്ന് കടകളിൽ നിന്നും ലഭിക്കുന്ന പച്ചക്കറികളിൽ എല്ലാം വലിയ തോതിൽ വിഷാംശം അടിച്ചിട്ടുള്ളവയായിരിക്കും. വളരെ എളുപ്പത്തിൽ ചീര കൃഷി ചെയ്തെടുക്കാൻ സാധിക്കുമെങ്കിലും പലർക്കും അത് ചെയ്യേണ്ട രീതി എങ്ങനെയാണെന്ന് അറിയുന്നുണ്ടാവില്ല. അത്തരം ആളുകൾക്ക് തീർച്ചയായും ചെയ്തു നോക്കാവുന്ന ഒരു ചീര നടൽ രീതിയെപ്പറ്റി വിശദമായി മനസ്സിലാക്കാം.
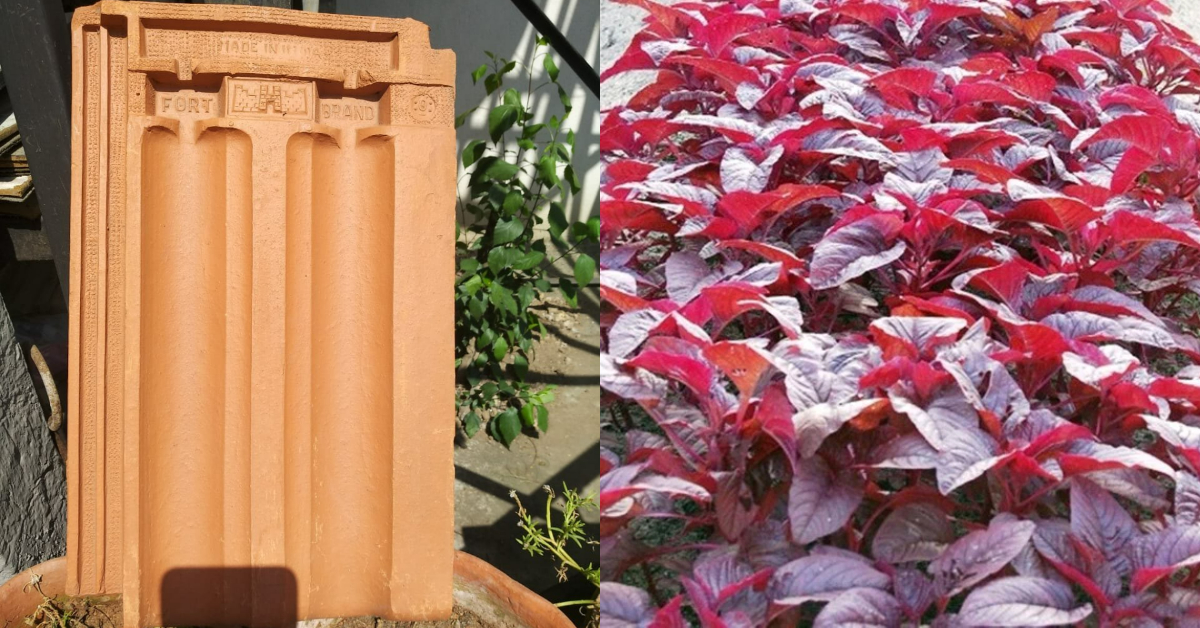
ഈയൊരു രീതിയിൽ ചീര നടാനായി ഓട് ഉപയോഗപ്പെടുത്താവുന്നതാണ്. അത്യാവശ്യം വലിപ്പമുള്ള 4 ഓടുകളാണ് ആവശ്യമായിട്ടുള്ളത്. ഓടുകൾ എടുത്ത് പരസ്പരം മുട്ടി നിൽക്കുന്ന രീതിയിൽ ചതുരാകൃതിയിൽ ആണ് സെറ്റ് ചെയ്ത് കൊടുക്കേണ്ടത്. അതിനുശേഷം ഓടുകൾ നല്ല ബലത്തോടെ നിൽക്കുന്നതിനായി ഒരു കയർ അതിന് ചുറ്റുമായി കെട്ടിക്കൊടുക്കുക. ശേഷം ചീര നടാൻ ആവശ്യമായപോട്ടിംഗ് മിക്സും മറ്റു സാധനങ്ങളും അതിനകത്തേക്ക് ഇട്ടു കൊടുക്കണം.
ഏറ്റവും താഴത്തെ ലയറിലായി ഉണങ്ങിയ വാഴയില, കരിയില എന്നിവ ഇട്ടുകൊടുക്കാവുന്നതാണ്. ഇവ ചെടിയുടെ വളർച്ചയെ നല്ല രീതിയിൽ കൂട്ടുന്നതാണ്. അതിനുശേഷം മുകളിലായി ജൈവവളം മിക്സ് ചെയ്ത് ഉണ്ടാക്കുന്ന പോട്ടിംഗ് മിക്സ് വിതറി കൊടുക്കാം. ജൈവ കമ്പോസ്റ്റ് തയ്യാറാക്കാനായി അടുക്കളയിലെ പച്ചക്കറി വേസ്റ്റ് മണ്ണിനോടൊപ്പം ചേർത്ത് വെച്ചാൽ മതി. ശേഷം മുകളിലായി കുറച്ച് ചാരപ്പൊടി കൂടി വിതറി കൊടുക്കാവുന്നതാണ്.
വിത്ത് ആ പാവുന്നതിനു മുൻപായി മണ്ണിലേക്ക് കുറച്ചു വെള്ളം കൂടി തളിച്ചു കൊടുക്കണം. അതിനുശേഷം ചീര വിത്ത് വിതറി കൊടുക്കാം. മണ്ണ് വല്ലാതെ നനവില്ലാത്ത രീതിയിൽ കാണുമ്പോൾ മാത്രം മുകളിലായി കുറച്ചു വെള്ളം തളിച്ച് കൊടുക്കാവുന്നതാണ്. ഈയൊരു രീതിയിൽ എളുപ്പത്തിൽ വീട്ടാവശ്യങ്ങൾക്കുള്ള ചീര മുറ്റത്ത് തന്നെ വളർത്തിയെടുക്കാം. വിശദമായി മനസ്സിലാക്കാൻ വീഡിയോ കാണാവുന്നതാണ്. Cheera Krishi Easy Tips Using Oodu Credit : POPPY HAPPY VLOGS
🌱 Cheera Krishi Using Oodu – Easy & Natural Method
1. What You Need:
- Broken or old Oodu (roof tiles)
- Good garden soil or potting mix
- Cheera seeds (Red or Green Amaranthus)
- Cow dung or organic compost
- Water spray bottle
🪴 Step-by-Step Tips:
- Select Oodu Pieces:
Use wide and slightly curved pieces of roof tile. Make sure there are no sharp edges. - Fill with Soil:
Place the Oodu piece flat on a sunny area like a balcony or backyard. Fill it with nutrient-rich soil (1:1 ratio of red soil and compost). - Sow the Seeds:
Sprinkle cheera seeds evenly on the surface. Cover lightly with a thin layer of soil. - Watering:
Use a spray bottle to gently moisten the soil twice a day—morning and evening. Avoid overwatering. - Sunlight:
Ensure the Oodu tray gets at least 4–5 hours of sunlight daily. - Growth Monitoring:
Within 3–5 days, germination begins. Thin out the overcrowded seedlings after 10–12 days. - Harvesting:
You can start harvesting tender cheera leaves within 20–25 days. Pluck only the top parts to allow regrowth.
🌿 Advantages of Using Oodu:
- Natural drainage due to tile curvature
- No cost (reuse old materials)
- Ideal for terrace gardening / balcony gardening
- Eco-friendly & beginner-friendly
🧑🌾 Extra Tips:
- Add neem cake powder to soil to avoid pests.
- Mix a spoon of wood ash once a week for better leaf growth.
- Rotate the Oodu position every 2 days for uniform sunlight.
Comments are closed.