
സോപ്പ് ഇനി കടയിൽ നിന്നും വാങ്ങേണ്ട; വീട്ടിൽ തന്നെ നാച്ചുറലായി തയ്യാറാക്കി എടുക്കാം; ഒന്ന് പരീക്ഷിച്ചു നോക്കൂ..!! | Soap Making At Home
“Create Your Own Natural Soap!”
Discover the joy of making soap at home using natural ingredients like oils, herbs, and essential oils. Customize scents, colors, and textures for gentle, chemical-free skin care. Homemade soap is fun, eco-friendly, and perfect for personal use or thoughtful, handmade gifts.
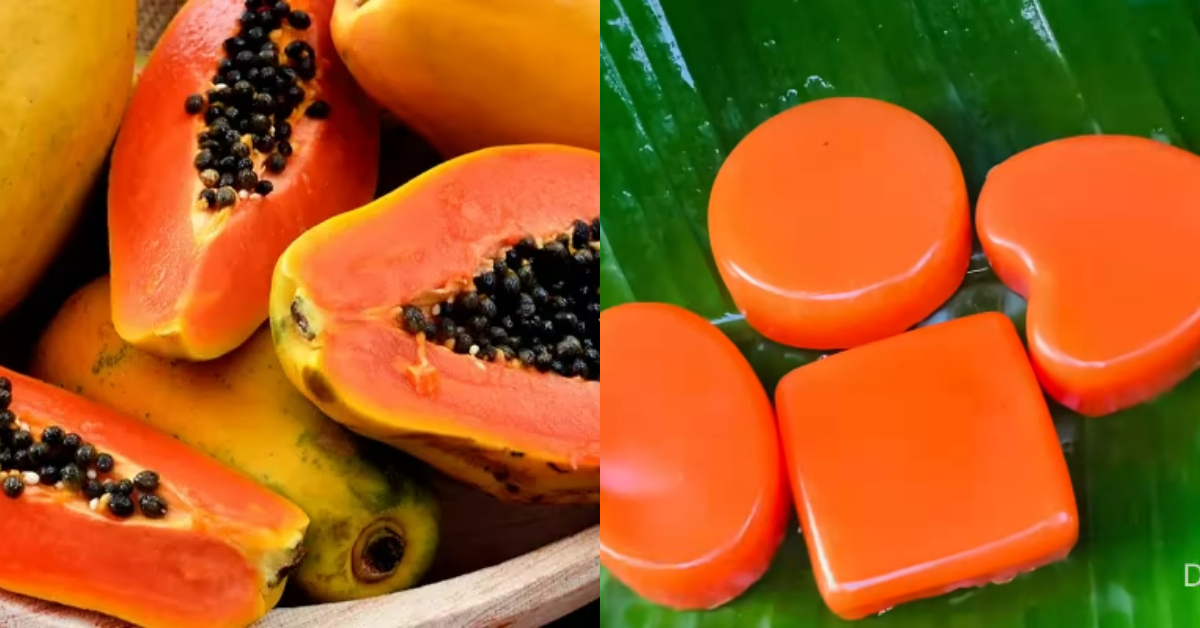
Soap Making At Home : നമ്മുടെയെല്ലാം വീടുകളിൽ ഒഴിച്ചുകൂടാനാവാത്ത സാധനങ്ങളിൽ ഒന്നായിരിക്കുമല്ലോ കുളിക്കാനായി ഉപയോഗപ്പെടുത്തുന്ന സോപ്പ്. വ്യത്യസ്ത നിറങ്ങളിലും, മണത്തിലും,ക്വാളിറ്റിയിലുമെല്ലാം പല ബ്രാൻഡുകളുടെയും സോപ്പുകൾ ഇന്ന് വിപണിയിൽ സുലഭമായി ലഭിക്കാറുണ്ട്. എന്നാൽ ഇവയിൽ അടങ്ങിയിട്ടുള്ള കെമിക്കലുകളെ പറ്റി വലിയ ധാരണ ഇല്ലാത്തതുകൊണ്ട് തന്നെ പലരും ഇത്തരത്തിലുള്ള സോപ്പുകൾ പേടിച്ചായിരിക്കും ഉപയോഗപ്പെടുത്തുന്നത്. കുറഞ്ഞത് കുട്ടികൾക്ക് ആവശ്യമായ സോപ്പുകൾ വളരെ എളുപ്പത്തിൽ വീട്ടിൽ തന്നെ തയ്യാറാക്കി എടുക്കാൻ സാധിക്കുമെങ്കിൽ അത് തന്നെയല്ലേ നല്ലത്? പപ്പായ ഉപയോഗപ്പെടുത്തി വളരെ എളുപ്പത്തിൽ നിർമ്മിച്ചെടുക്കാവുന്ന ഒരു സോപ്പിന്റെ കൂട്ട് വിശദമായി മനസ്സിലാക്കാം.
1. Methods of Soap Making
There are mainly two methods for beginners:
a) Melt and Pour (Beginner-Friendly)
- What it is: You melt a pre-made soap base, add your own colors, scents, or additives, then pour into molds.
- Pros: Quick, easy, safe—no handling of lye.
- Cons: Limited creativity with soap base
ഈയൊരു രീതിയിൽ സോപ്പ് തയ്യാറാക്കി എടുക്കാനായി ഒരു വലിയ പപ്പായ എടുത്ത് അതിന്റെ കുരുവെല്ലാം കളഞ്ഞ് ചെറിയ കഷണങ്ങളായി മുറിച്ചെടുക്കുക. ഇത് ഒരു മിക്സിയുടെ ജാറിലേക്കിട്ട് പേസ്റ്റ് രൂപത്തിൽ അരച്ചെടുക്കാവുന്നതാണ്. ശേഷം മാർക്കറ്റുകളിൽ നിന്നും വാങ്ങാൻ കിട്ടുന്ന നല്ല ക്വാളിറ്റിയിൽ ഉള്ള നിറമില്ലാത്ത സോപ്പ് വാങ്ങി അത് ചെറിയ കഷണങ്ങളായി മുറിച്ചെടുക്കുക. ഒരു വലിയ പാത്രത്തിൽ വെള്ളം തിളപ്പിക്കാനായി വച്ച് അത് തിളച്ചു തുടങ്ങുമ്പോൾ മുകളിലായി സോപ്പിന്റെ കൂട്ട് ഒരു പാത്രത്തിൽ ഡബിൾ ബോയിൽ ചെയ്യാനായി വയ്ക്കുക. സോപ്പിന്റെ കഷ്ണങ്ങൾ മെൽറ്റായി തുടങ്ങുമ്പോൾ അതിലേക്ക് തയ്യാറാക്കി വെച്ച പപ്പായയുടെ കൂട്ട് കൂടി ഒഴിച്ചു കൊടുക്കാവുന്നതാണ്. ഇതോടൊപ്പം സോപ്പിന് കൂടുതൽ നിറം ആവശ്യമാണെങ്കിൽ രണ്ട് തുള്ളി ഫുഡ് കളർ, വെജിറ്റബിൾ ഗ്ലിസറിൻ എന്നിവ ചേർത്ത് മിക്സ് ചെയ്ത് എടുക്കാവുന്നതാണ്.
b) Cold Process (Traditional Soap Making)
- What it is: You mix oils and lye (sodium hydroxide) to trigger saponification.
- Pros: Full control over ingredients, texture, and scent.
- Cons: Requires careful handling of lye; takes 4–6 weeks to cure.
- Steps:
- Measure oils and lye solution accurately.
- Mix carefully using a stick blender.
- Add fragrances, colors, or exfoliants.
സോപ്പിന് നല്ല മണം ആവശ്യമാണ് എന്ന് തോന്നുകയാണെങ്കിൽ അല്പം റോസ്മേരി ഓയിൽ, കൂടാതെ രണ്ടു വൈറ്റമിൻ ടാബ്ലറ്റ് പൊട്ടിച്ചത് എന്നിവ കൂടി ചേർത്തു കൊടുക്കണം. എല്ലാ ചേരുവകളും നല്ലതുപോലെ മിക്സ് ആയി കട്ടിയായി തുടങ്ങുമ്പോൾ സ്റ്റൗ ഓഫ് ചെയ്യാവുന്നതാണ്. ഇത്തരത്തിൽ തയ്യാറാക്കി എടുക്കുന്ന സോപ്പിന്റെ കൂട്ട് ഇഷ്ടമുള്ള മൗൾഡുകളിലേക്ക് ഒഴിച്ച് സെറ്റ് ചെയ്യാനായി വെക്കാം. ഏകദേശം ഒരു മണിക്കൂർ മുതൽ ഒന്നര മണിക്കൂർ ആകുമ്പോഴേക്കും തന്നെ സോപ്പ് സെറ്റായിട്ടുണ്ടാകും. സോപ്പിനു മുകളിൽ വരുന്ന ബബിൾസ് കളയാനായി കടകളിൽ നിന്നും ലഭിക്കുന്ന സോപ്പിൽ അടിക്കാവുന്ന പ്രത്യേക കെമിക്കൽ സ്പ്രേ വാങ്ങി അടിച്ചു കൊടുക്കുകയും ചെയ്യാവുന്നതാണ്. കൂടുതൽ വിശദമായി മനസ്സിലാക്കാൻ വീഡിയോ കാണാവുന്നതാണ്. Soap Making At Home
Soap Making at Home – Complete Guide
1. Methods of Soap Making
There are mainly two methods for beginners:
a) Melt and Pour (Beginner-Friendly)
- What it is: You melt a pre-made soap base, add your own colors, scents, or additives, then pour into molds.
- Pros: Quick, easy, safe—no handling of lye.
- Cons: Limited creativity with soap base.
- Steps:
- Cut soap base into small cubes.
- Melt using microwave or double boiler.
- Add essential oils, colors, herbs, or oats.
- Pour into molds, let cool 2–4 hours.
- Unmold and store in a dry place.
b) Cold Process (Traditional Soap Making)
- What it is: You mix oils and lye (sodium hydroxide) to trigger saponification.
- Pros: Full control over ingredients, texture, and scent.
- Cons: Requires careful handling of lye; takes 4–6 weeks to cure.
- Steps:
- Measure oils and lye solution accurately.
- Mix carefully using a stick blender.
- Add fragrances, colors, or exfoliants.
- Pour into molds, cover, and insulate for 24–48 hours.
- Unmold and let cure for 4–6 weeks.
2. Common Ingredients
- Base oils: Olive oil, coconut oil, palm oil, castor oil.
- Lye: Sodium hydroxide (for cold process only).
- Liquid: Water, milk, or herbal tea.
- Additives: Herbs, oatmeal, coffee grounds, clays.
- Fragrance/Essential oils: Lavender, peppermint, lemongrass.
- Colorants: Natural powders (turmeric, cocoa, spirulina) or soap-safe dyes.
3. Safety Tips
- Always wear gloves and goggles when handling lye.
- Work in a well-ventilated area.
- Use stainless steel or heat-resistant containers for lye.
- Keep vinegar nearby to neutralize spills.
- Keep children and pets away during soap-making.
4. Storage & Shelf Life
- Store in a cool, dry place.
- Avoid moisture to prevent softening.
- Properly cured cold-process soap lasts up to 1–2 years.
5. Tips for Beginners
- Start with melt-and-pour if new to soap making.
- Experiment with small batches before making larger quantities.
- Use silicone molds for easy release.
- Keep a soap-making journal to record recipes and results.
Comments are closed.